

UNet: Architecture and Applications in Image Segmentation
Contents
1. Introduction
UNet is a convolutional neural network architecture specifically designed for image segmentation, especially popular in medical and remote sensing tasks. Introduced by Olaf Ronneberger in 2015, it stands out due to its symmetric “U”-shaped design.
2. UNet Architecture (Updated)
UNet follows a symmetric “U” shape, consisting of two main stages: downsampling (reducing spatial resolution, increasing feature depth) and upsampling (restoring the image to its original size). A key highlight is the use of skip connections that bridge corresponding layers between downsampling and upsampling, preserving spatial details and improving training efficiency.
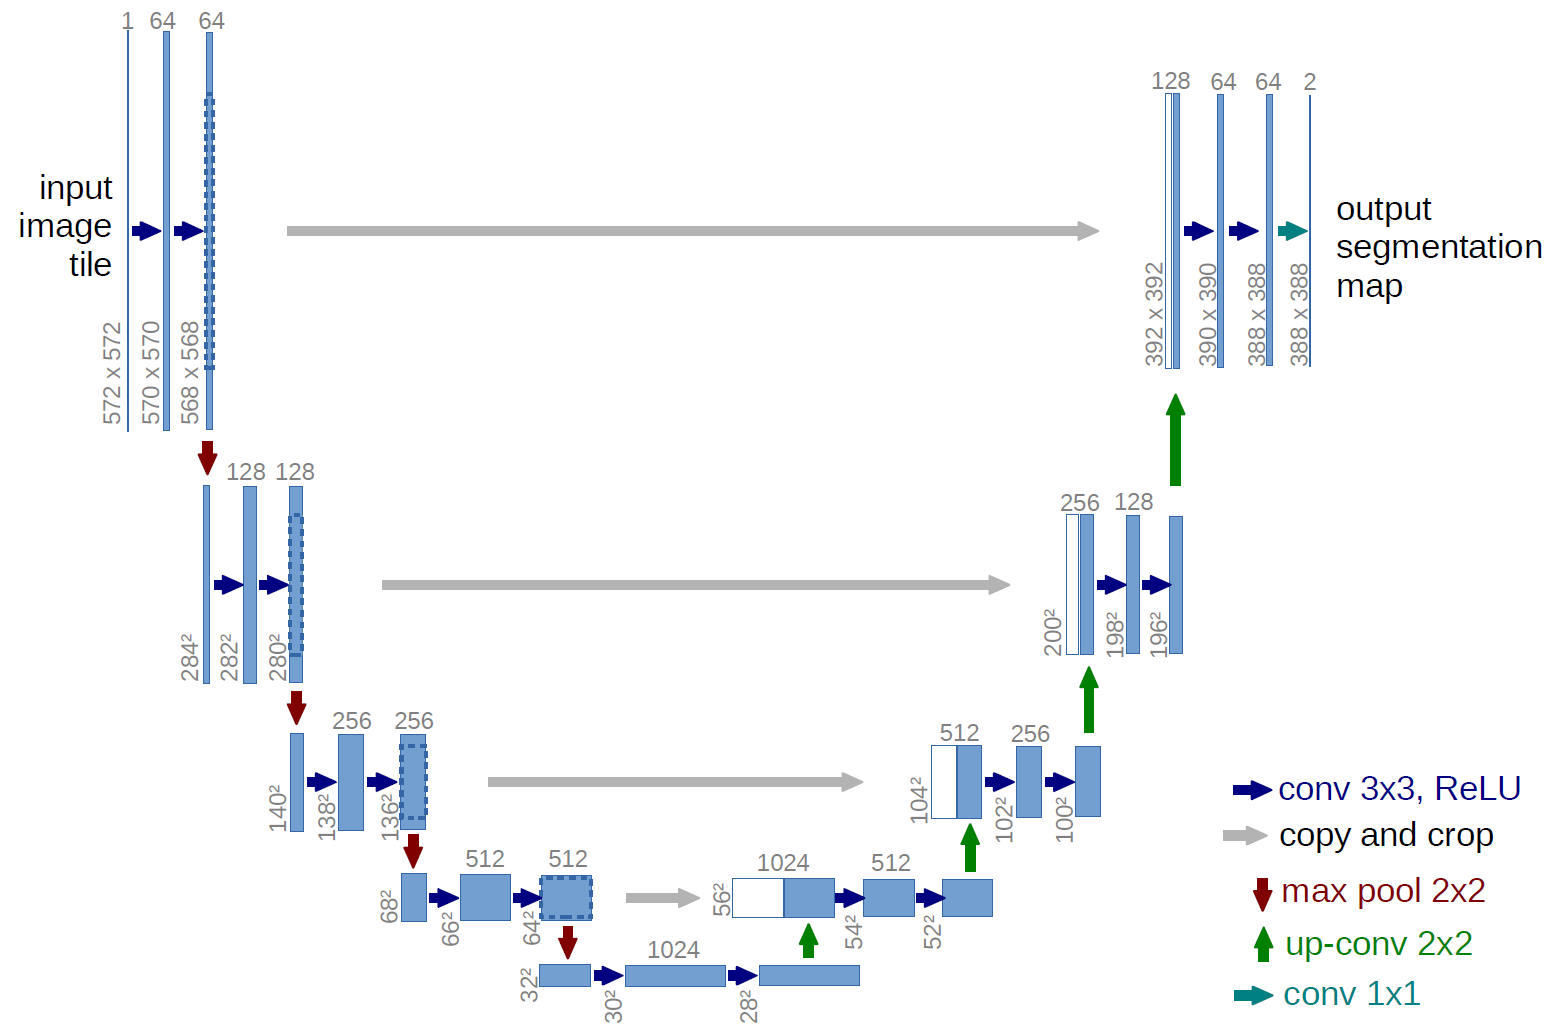 UNet model architecture
Downsampling: Each step contains two convolutional layers (3×3 kernels, padding to maintain size), followed by ReLU activation, and a MaxPooling layer (2×2) that reduces the image size by half. The number of feature channels increases at each step to capture richer features.
Upsampling: Uses transposed convolutions (ConvTranspose) or simple upsampling to double the image dimensions. Then, it concatenates the corresponding feature map from the downsampling stage via skip connections. This is followed by two 3×3 convolutional layers with ReLU.
Skip Connections: These help retain spatial information lost during downsampling and significantly improve segmentation accuracy, especially along object boundaries.
Explaining the UNet Architecture
The model has a clear “U” shape. Let’s break it down into three main parts, then follow the step-by-step data flow.
🔻 1. Downsampling – Shrinking the Image to Extract Features
The left side of the U-Net is the contracting path:
- Input image (e.g.,
572x572x1). - After 2× Conv 3×3 + ReLU → almost same size, but feature channels increase (e.g., to
64). - Then a MaxPooling 2×2 (red arrow) halves the spatial dimensions.
Each time:
- Image → smaller spatially, but
- Features → deeper and more abstract
🔺 2. Upsampling – Reconstructing the Image
After reaching the bottom (bottleneck), the model starts to expand the representation:
- Up-conv 2×2 (green arrow): doubles the image size.
- Concatenate with the corresponding feature map from the left (gray arrow).
- Then apply 2× Conv 3×3 again.
Result: reconstructed image with retained meaningful features.
3. Skip Connections – Preserving Details
The horizontal gray arrows are skip connections – acting as bridges:
- Pass spatial info from the downsampling side to the upsampling side.
- Preserve edges, fine details, object boundaries…
This lets the model combine high-level features with spatial precision.
Data Flow Through UNet (Based on the Figure)
Let’s break down how data flows through UNet step by step:
Step 1: Input
- Input image:
572x572x1(grayscale). - After 2× conv → around
568x568x64.
Step 2: Downsampling – Gradual Compression
- Pooling 2×2 →
284x284x64 - Conv x2 →
280x280x128→ pooling →140x140x128 - Continue:
→138x138x256→ pooling
→68x68x512→ pooling
→ bottleneck:28x28x1024
At the bottleneck, the image is small but semantically rich.
Step 3: Upsampling – Gradual Expansion
- Upconv →
56x56x512
→ concat with left side → conv x2 →56x56x512 - Continue:
→104x104x256
→200x200x128
→388x388x64
Step 4: Output
- Final 1×1 conv →
388x388x2
→ Each pixel gets a 2-class probability (e.g., foreground/background).
UNet Architecture Summary
| Stage | Image Size (Example) | Purpose |
|---|---|---|
| Input | 572x572x1 | Load image |
| Downsampling | 568→284→140→70→34→28 | Learn abstract features, shrink size |
| Bottleneck | 28x28x1024 | Rich, deep representation |
| Upsampling | 28→56→104→200→388 | Restore size + retain details |
| Output | 388x388x2 | Segmentation map (per-pixel classification) |
Strengths of UNet:
- Symmetric and intuitive structure
- Skip connections retain spatial precision
- Easy to train, performs well in medical and satellite imaging
UNet in Practice with Python
Segmentation Models PyTorch (SMP) is a convenient library for building and training image segmentation models, including UNet. It supports various backbones (CNNs for feature extraction) that can boost performance.
Example using UNet with ResNet backbone:
1
2
3
4
5
6
7
8
import segmentation_models_pytorch as smp

model = smp.Unet(
    encoder_name="resnet34",        # CNN backbone
    encoder_weights="imagenet",     # Pretrained weights
    in_channels=3,                  # Input channels (RGB)
    classes=1                       # Output classes (e.g., binary segmentation)
)
3. Applications of UNet
UNet is widely used in segmentation tasks:
- Medical imaging: tissue and organ segmentation
- Remote sensing: land, river, and building segmentation
- Object counting: cells, seeds, etc.
4. Advantages and Limitations
Advantages:
- Performs well with limited data
- Preserves details thanks to skip connections
- Simple architecture, easy to extend (UNet++, ResUNet, …)
Limitations:
- Requires fixed input size (unless properly padded)
- High memory usage with large images
5. References
[1] Scikit-learn Developers. sklearn.metrics.confusion_matrix — scikit-learn 1.4.2 documentation. 🔗 https://scikit-learn.org/stable/modules/generated/sklearn.metrics.confusion_matrix.html
[2] Segmentation Models PyTorch. UNet model documentation. 🔗 https://smp.readthedocs.io/en/latest/models.html#unet